Pages

Showing posts with label craft. Show all posts

Tuesday, January 10, 2012

DIY: Gold Glitter Earrings


What a great idea!! AND SO EASY!!! You could make them in ALL colors :)


Monday, December 5, 2011

GREAT IDEAS!! Wine Boxes & CORKS


I love my raised garden, my plants have done so much better :) What a cheap simple way to

have one of your own.


wine boxes - free at any local liquor store...such a great idea for a raised garden!


Source: llhdesignsblog.com via Jacqueline on Pinterest


Use your leftover corks for garden markers


Recycled wine bottles used as edging

Saturday, December 3, 2011

DIY Solar Lamps:)

I can picture these around the patio!! You could make them for Christmas!


http://www.moredesignplease.com/moredesignplease/2011/9/6/diy-mason-solar-jars.html

Thursday, December 1, 2011

Friday, July 15, 2011

DIY Zebra Pillow

P.S. Quick IDEA: HOW CUTE WOULD THIS BE IF YOU USED TURQUOISE OR RED paint!


You will need:

One white pillow
magic marker
black acrylic paint

Draw your pattern with a black marker and fill it in with black paint. :) SIMPLE! The Lennoxx website says it looks better in person.

I give all the credit to The Lennoxx :) Find the link to the project below.
http://www.thelennoxx.com/thelennoxx/diy/my-diy-zebra-accent-pillow/

Monday, November 29, 2010

Easy Cheap Tablescape

I found these cones at Wal-Mart last year at the after Christmas sales. I also got the glitter balls and cheap wreath last year for 80% off. :) They still have the holly berry wreaths for $7.99 this year at our Wal-Mart..which isn't a bad price.

With a little bit of hot glue you can have this. I just stuck clusters of glitter balls on the wreath and glued the cones in the center. It was easy and cheap. You could use any wreath and place anything in the middle. For example: Nutcrackers, Snowmen, etc...you get the idea :)


Wednesday, October 6, 2010

Garage Sale Find

Mom found this crow candle stick at a garage sale last year. She added a star-foam ball and stuck black, purple, and orange flowers on it. It turned out fabulous! THANK YOU MOM! :)

(She spray painted purple flowers to make the black ones, it's much cheaper to do it this way)

Wednesday, May 5, 2010

Old Patio Coffee Table

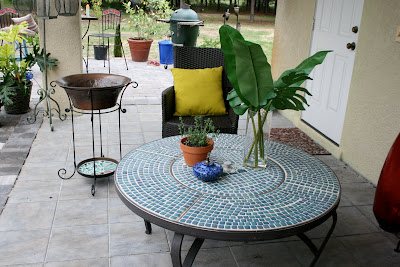
Last week I started the coffee table project. Here is what the table looked like before the pool tiles went on. I've had this table for over 5 years now, Jim and I got it at Target back in the day. The center piece comes out and you can use it for a fire-pit or ice bucket to keep your drinks chilled. Mom and I found these pool tiles at a garage sale last year, mom paid $10 for all of them.

Starting the first section...I thought I was going to be done that night...little did I know I would only get one section done and come in with 10 mosquito bites. Have I ever told you how much mosquitos love me? It's horrible :(


AFTER


We have company coming in over the weekend so tonight I will power wash and get everything organized out there. I will try to take more pictures soon. I love how the table turned out. It will go perfectly with that future pool.

LOOK WHAT ELSE CAME IN THE MAIL TODAY :) LOUNGE CHAIRS...We will soak up the sun in these this weekend, with key lime drinks in hand.


Friday, April 23, 2010

Mosaiced Beverage Stand

I took this tray...


and this broken plate...

Mosaiced them..


and made this...

Now picture champagne splits chilling on ice :) You can also pop the tray out and serve drinks on it. It's so easy and if you want to try mosaicing at home and need some help, please email me and I will send you directions. This took about 30 minutes to do and now I have something that's one of a kind :)

OH and THANK YOU MOM for lending me your beverage stand...I hope you don't want it back!

Tuesday, July 14, 2009

Mosaiced $2 Garage Sale Table

I found this table at a garage sale about a month ago. I love small pieces that you can use as a drink stand, where you have a chair and a coffee table looks to large, but you still need a place to sit your drink, well these work great. I painted the table black with spray paint. Then I took these mirrored mosaics (I found mine at a garage sale years ago) (Mom gave me some circles as well)…you can buy them at your local craft store and I mosaiced away.

Before I mosaiced it...

Lay your pieces out in a pattern before you glue

I used Gorilla glue (NOT MY FAV) I prefer Liquid nails. After gluing all the pieces down stick something on top so they are pressed down, this gets the glue sealed on tightly to the table. ( I used a wine glass and the mirror container)

Here is what it looks like now...

NOW I need your help, should I go ahead and grout, or should I leave it without grout. If you think I should use grout should I use a white or black? I would love your opinions. Mom thinks I should leave it, Jim thinks it needs grouted. Let me know your thoughts!

Tuesday, July 7, 2009

Make You Own Wine Charms

I made my own wine charms over the weekend. I even came up with an idea I'm calling the "Wine Glass Bracelet" :) Here's the EASY directions below!

You will need:
jewelry wire (I chose purple, purples is my new favorite color)
wire cutters
Vintage costume jewelry or charms
beads
A jar of my grandmothers costume jewelry


It's real simple, cute the wire, crimp one end. Thread beads onto wire, then use a piece of jewelry or bigger bead (You can use anything) for the center. When your satisfied with the look crimp the other end. The two crimped ends attach to your wine glass...


The Wine Bracelet
I just took the wire, coiled it around the stem, then strung beads and stuck a charm on the end. Very simple and it jazzes up your wine glasses! :)


Tuesday, June 30, 2009

Happy 4th of JULY!

What are you doing for the 4th? I'm cooking out and then heading to a tiny town near by to watch the fireworks. Does anyone have any 4th of July traditions? I would love to hear about them!

Now, Look what I found on Martha.com!
*********************************************************

Add a burst of patriotic spirit to summer sips with these red, white, and blue umbrellas. Pop one into every beverage you serve for an instant air of festivity. Besides doubling as stirrers, the little paper parasols help identify each guest's glass. Once you've fashioned our patterns into umbrellas, grab yourself a drink, sit back, and get ready to watch the sky.
Parasol How-ToYou'll need wooden skewers a couple of inches longer than your drinking glasses are tall. Download and print umbrella designs onto plain white paper. Cut out with scissors, then cut along the dotted line on each. Create a cone by slightly overlapping edges; secure using a glue stick or tape underneath. Poke a skewer through the underside of the cone's point.
************************************************************

Fashioned from red, white, and blue paper stars, this festive garland adds a patriotic touch to a doorway or mantel. Easy and inexpensive to make, it's a great holiday project for both children and adults.

Tools and Materials
Letter-size, stationery-weight paper in red, white, and blue
Paper cutter or scissors
Ruler
Pencil
Bone folder
Mini-stapler
1/8-inch hole punch
White cotton string
How-To

1. Cut paper to 6 by 11 inches. Using a bone folder to make crisp folds, fold the paper in half; then, fold it in half twice more. Open the folded paper, and use the creases as guides to accordion fold the paper to resemble a fan.

2. With the paper still folded, find the center, and mark it with a pencil. Use a desktop stapler to staple the center. (The staple should be perpendicular to the folds.)
3. Make a mark, 1 inch from each end on the folded side of the fan. Using scissors, trim both ends of the paper on an angle, starting from the 1-inch marks and cutting to the paper's edges.
4. Fan out the paper to form a star, and bring the ends together. Staple the ends together with a mini-stapler.

5. With a 1/8-inch hole punch, punch 2 holes, one fold apart from each other. Thread cord through one hole, around the back of the star, and then through the other hole.


**********************************************************

This string of votives will shed a soft glow over your Fourth of July celebration. Place tea candles in translucent red, white, and blue colored-glass votives, and tuck each into a tiny wire basket.


To make a basket, cut a 21-inch piece of 20-gauge annealed wire with a wire cutter. Fold the wire in half, and crimp just below the fold with round-nose pliers. Wrap crimped end over a pencil to form a hook.

Hold the base of the hook tightly with pliers, separate the two lengths of wire, then twist tightly around each other three times.

To form the cuff that will hold the votive, use pliers to make a 90-degree bend,4 1/4 inches from the hook base, on each length of wire. Situate the bendson opposite sides of the votive, about two-thirds of the way from the bottom of the glass.

Bring each cut end around to meet the opposite bend. With the tip of the pliers, make a tiny loop at each cut end. Hook the loops to the bends; use pliers to close loops tightly. Insert votive into the circle formed.
Hang several candle lanterns from their hooks on a taut wire strung between two points. Be certain flames are not near any flammable surfaces, and never leave votives unattended.

Monday, May 18, 2009

River Rock on Shower Floor

John is almost done with our tile! :) YIPPEE!!
John showing me how to mix my thinset (mortar)

*********************************************************************************

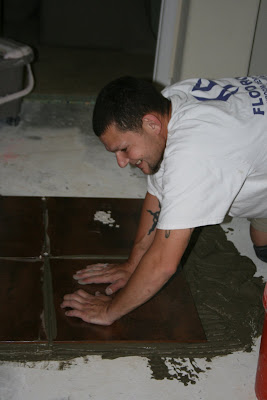
I couldn't’t have done this without John, he was a good teacher! He taught me how to mix my thinset and grout. I’m sure his ears hurt because I was asking him questions the whole time I was laying the rock down.

I used the river rock on the mesh, BUT now that I look back I would have rather used just river rock. I ended up pulling most of them off and laying them free handed. If you guys want to try this at home, email me and I will send you the instructions. It’s easy, but make sure you have 2 days at home to dedicate to this project. It ended up being a VERY tiresome job!


Thinset and rock down! Now it must dry at least 15 hours before grouting
Grouting
Grouts DOWN!
This picture was from this morning, the grout is drying. It's STILL not finished. I must go in and clean the edges up and polish the rocks. You can see some spots are darker than others, the finished product will be the light colored grout. When it's all complete and polished up, I will post the final picture. It looks so much better in person.

Hope everyone enjoyed their weekend!

Friday, May 15, 2009

Friday

The tile looks even better than expected. This picture is last nights work. John said by the time I get home from work the whole living room will be complete. YEAH!! John will be at our house working day and night all weekend, I know poor thing. I hate it, I wish he could go home to his family but the job must get done.

Tile this morning

While he has been there the past 2 nights I have had grout on my mind, so I started mosaicing more light switch plates. I grouted them this morning and they look great. Also, John will be teaching me how to lay tile, so this weekend I’m using tumbled river rock and resurfacing our shower floor…don’t worry I will take pictures, I’m so excited about this and after learning this I can move on to bigger and better things like my back splash for my kitchen.

I must head out NOW to go to the dentist then I will be off to Lowes to buy some supplies for my weekend project. HAPPY FRIDAY!
++++++++++++++++++++++++++++++++++++++++++++++

Mosaiced light switch plates (drying)


I collect old costume jewelry for the mosaic projects...here is some below

My work space